
News
-

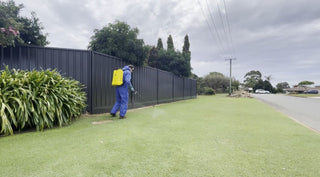
How to Choose the Right Sprayer for Different Chemicals
Whether you’re a professional landscaper, groundskeeper, agricultural operator or a keen home gardener, selecting the right sprayer for applying chemicals like herbicides, fungicides, insecticides or fertilisers can make a major...
-

Revegetation & Tree Planting: Setting Projects Up for Success in the Year Ahead
As we move into a new year, many revegetation and tree planting projects are shifting from planning into action. Whether it’s large-scale environmental restoration, urban greening, roadside planting, or community-led...
-

Firewise Design in Action: A New Garden Supporting Healing & Safety at Rockingham Hospital
A remarkable new Firewise Garden has been unveiled at Rockingham General Hospital, designed and built by The Forever Project. Created as a calming outdoor sanctuary, the garden serves a dual...
-

Get Your Garden Summer-Ready for Hosting: Simple DIY Upgrades
Summer BBQs, warm evenings, and backyard catch-ups are around the corner, but nothing creates last-minute stress like realising your garden looks messy, unfinished, or unprepared just as guests arrive. The...
-

How to Prevent Heat Stress in Trees and Plants
When we talk about heat stress in trees and plants, we're referring to the condition where high temperatures, often combined with intense sunlight, low humidity or insufficient water, begin to...
-

Building Fire-Resilient Landscapes
Over the weekend of 7–9 November, StrataGreen visited the Perth 4WD & Adventure Show, where the Forever Project and DFES showcased their inspiring Firewise Garden. This unique display demonstrated how...
-

Waterwise Urban Tree Planting: How TerraCottem Saves Water and Improves Tree Survival
Urban tree planting plays a vital role in building cooler, greener, and more resilient cities — but it also comes with challenges. Harsh conditions, compacted soils, limited root space, and...
-
Choosing the Right Herbicides for Combating Weeds
Weeds are more than just an eyesore they compete with plants for nutrients, water and sunlight, often threatening the health and productivity of landscapes, lawns, and agricultural sites. Selecting the...
-
Building a Firewise Future
At this year’s Royal Show, visitors had the chance to explore something truly inspiring — the Firewise Garden, created by The Forever Project in partnership with the Department of Fire...
-

Spring Lawn Care Checklist: From Weeds to Watering
As the frost fades and daylight stretches, spring is a vital time to set your lawn up for a season of lush, healthy growth. Good care now prevents problems later,...
-

Why Soil Preparation is key to a Healthy Spring Garden
As the grey shades of winter begin to fade and the first whispers of spring emerge, every enthusiastic gardener knows that success in the garden doesn't begin with planting, it...
-

TerraCottem SmartSoil Webinar
Join us for an in-depth session on TerraCottem SmartSoil® — the revolutionary soil conditioner designed to enhance water retention, nutrient availability, and plant establishment in even the most challenging growing conditions....


